Question: Define Mask and channels in adobe Photoshop?
Answer: Working with Masks and Channels
Photoshop
masks isolate and protect parts of an image, just like masking tape prevents a
house painter from getting paint on the window glass or trim. When you create a
mask based on a selection, the area not selected is masked, or protected from
editing.
With masks, you can create
and save time-consuming selections and then use them again. In addition, you
can use masks for other complex editing tasks for example, to apply color
changes or filter effects to an image.
In
Adobe Photoshop, you can make temporary masks, called quick masks, or you can
create permanent masks and store them as special grayscale channels called
alpha channels.
Question: How to create a quick
mask?
Answer: Creating a quick mask
Quick Mask mode is
fundamentally a selection marquee that’s shown in a different form. Both are
temporary because they disappear as soon as the current selection is changed.
Unless you save a quick mask as a more permanent alpha-channel mask, the
temporary mask will be discarded once it is converted to a selection.
Quick masks are helpful for
creating quick, onetime selections. In addition, using a quick mask is an easy
way to edit a selection using the painting tools.
The quick mask disappears
when you deselect it.
Quick Mask mode is great for
students because it’s much more forgiving than drawing a selection marquee. In
Quick Mask mode, there is never any danger of accidentally “dropping” a
carefully drawn selection.
In Quick Mask mode, a red
overlay appears, masking and protecting the area outside the selection the way
rubylith, or red acetate, masked images in traditional print shops. You can
apply changes only to the unprotected area that is visible and selected.
Question: How to edit in a quick
mask?
The advantage of editing
your selection as a mask is that you can use almost any tool or filter to
modify the mask. (You can even use selection tools.)
In Quick Mask mode, you do
all of your editing in the image window. Photoshop automatically defaults to
Grayscale mode. The foreground color defaults to black and the background color
defaults to white. When using a painting or editing tool in Quick Mask mode,
keep these principles in mind:
- Painting with white erases the mask (the red overlay) and increases the selected area.
- Painting with black adds to the mask (the red overlay) and decreases the selected area.
- Painting with gray areas lighter areas are more subject to change than darker areas.
Question: How to saving
a selection as a mask?
Answer: Saving a
selection as a mask
Quick masks are temporary. They disappear as soon as you deselect. However, you can save a selection as an alpha-channel mask so that your time-consuming work won't be lost and you can reuse the selection in this work session or a later one. You can even use alpha channels in other Photoshop image files.
Masks are saved in channels,
which can be thought of as storage areas for color and selection information in
an image.
To avoid confusing channels
and layers, think of channels as containing an image's color and selection
information; think of layers as containing painting and effects.
You can edit a mask
once it has been saved in a channel by painting on it in a channel using black,
white, and shades of gray. Black areas completely protect an image from
changes. White areas are completely subject to change. In gray areas, lighter
areas are more subject to change than darker areas.
Answer:
Loading a mask as a selection
The channel mask remains
stored in the Channels palette even after you've loaded it as a selection. This
means that you can reuse the mask whenever you want. To apply a saved mask to
an image or selection choose Select > Load Selection and
then select the mask (alpha channel) you want to use.
Loading a selection
into an image using shortcuts
You can reuse a previously
saved selection by loading it into an image. To load a saved selection using
shortcuts, do one of the following in the Channels palette:
- Select the alpha channel, click the Load Channel as Selection button at the bottom of the palette, and then click the composite color channel near the top of the palette.
- Drag the channel that contains the selection you want to load onto the Load Channel as Selection button.
- Ctrl-click (Windows) or Command-click (Mac OS) the channel containing the selection you want to load.
- To add the mask to an existing selection, press Ctrl-Shift (Windows) or Command-Shift (Mac OS), and click the channel.
- To subtract the mask from an existing selection, press Ctrl-Alt (Windows) or Command-Option (Mac OS), and click the channel.
- To load the intersection of the saved selection and an existing selection, press Ctrl-Alt-Shift (Windows) or Command-Option- Shift (Mac OS), and select the channel.
Question:
How to create and apply gradient mask in Adobe Photoshop?
Answer: Creating
a gradient mask
In addition to using black
to indicate what's hidden and white to indicate what's selected, you can paint
with shades of gray to indicate partial transparency. For example, if you paint
in a channel with a shade of gray that is at least halfway between white and
black, the underlying image becomes partially (50% or more) visible.
Applying
effects using a gradient mask
It’s important to understand
that this is not just an exercise about using a gradient to fade an effect. The
real point of this is that you can use shades of gray in a channel or mask to
control the intensity of an effect anywhere in an image. Darker parts of a
channel will apply an effect more intensely. You may use a feathered circular
mask to create a vignetting effect.
When
you load a gradient as a selection and then fill the selection with a color,
the opacity of the fill color varies over the length of the gradient. Where the
gradient is black, no fill color is present; where the gradient is gray, the
fill color is partially visible; and where the gradient is white, the fill
color is completely visible.
Question: Explain pen tool in Photoshop?
Answer:
The pen tool is one of the few tools available to you in Photoshop that works with Vector Graphics as opposed to Raster Graphics. Vector Graphics use mathematical statements and points in order to define their shape and other characteristics, and therefore are very scalable. In other words, vector graphics can be scaled to any size without ever losing quality.
With the Pen Tool, we can create lines and curves that can be put together to create custom shapes. If we combine the pen tool with some of the other vector shapes, we can create some intricate, scalable objects (I’ll be covering additional vector tools in other tutorials).
Getting Started
In order to help familiarize yourself with the pen tool, I’m going to take you through a series of examples that will show you how to draw and create some custom shapes.To begin, Create a New Document (I’m using 284×284 in my example, with default Photoshop Preferences).
Next, let’s enable the Grid. Go to View > Show > Grid, or Ctrl + ‘. Also Enable Snap (View > Snap, or “Shift + Ctrl + ;“).
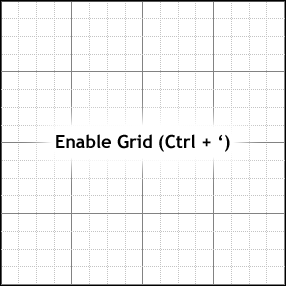
We enable grid + snapping so that when we draw using the pen tool, we can easily make precise shapes, and curves with little effort.
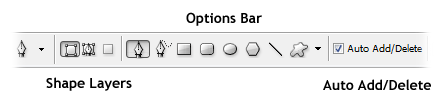
Now select your Pen Tool from the toolbar, and set it up to work on Shape Layers in the Options Bar.
Select a foreground color of your choice.
Drawing with the pen tool is easy. Simply position your cursor where you’d like to begin drawing, and click to create your first anchor point. Subsequent anchor points will all be connected to the last point drawn, allowing you to create custom shapes. To complete a shape, click the first anchor point.
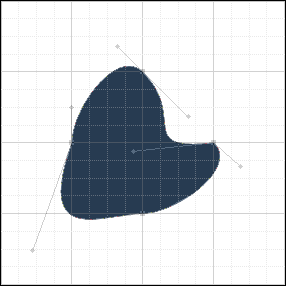
Go ahead an try it. See what you can create using basic anchor points. I managed to make a very primitive star.
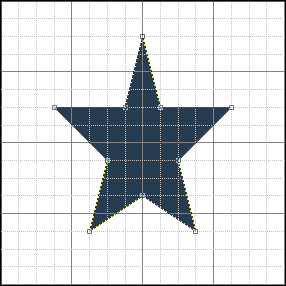
That’s simple enough, right?
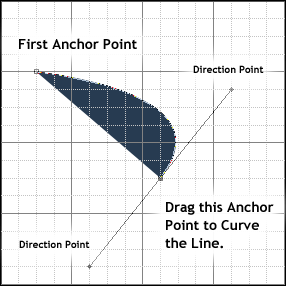
Drawing Curves with the Pen Tool
You may have already noticed that something interesting when drawing curves, and dragging after clicking to create an anchor point. The lines begin to curve!Go ahead and try it. After creating an anchor point, hold down the mouse button and drag in the direction you want your line to curve.
If you follow the below layout, you should be able to create a primitive circle shape.
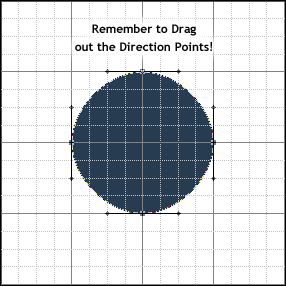
If you’re still having trouble, here’s a video that illustrates how to create the circle. When you see the icon change into a black pointer, that means that I’m DRAGGING once I create a point.
The curves characteristics are based on the length of these direction points, and at what angle they are drawn at. After some time practicing with them, you should become more familiar with drawing more complex curves. It should also be noted that you can change any directional points with the pen tool by holding Ctrl, or Ctrl + Alt.
Example:
Example Shapes
Let’s take what we’ve learned so far, and apply it in some basic design. If you’re using the same sized document as I am (with default Photoshop grid preferences), you should be able to Copy + Paste these templates in your document, and follow my anchor points easily.First let’s make a Rounded Rectangle. We already have a custom shape that does this, but sometimes designs call for modified rounded boxes of sorts.
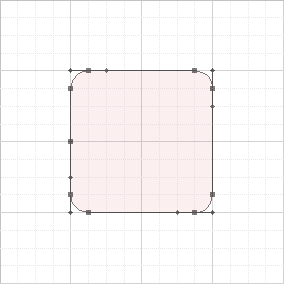
The Rounded Rectangle Shape uses basic curves, and is very simple to create. With some slight modifications, we can make rectangles with only 1, 2, or 3 of the corners rounded, while keeping the rest sharp corners.
Here is another template that focuses on “S” shaped curves, as seen in frequency waves.

“S” curves are used all the time in more complex shapes. They are created by dragging the Directional Points of two sibling anchor points in the same direction.
For our last example, let’s make a “Pen Tool” custom shape!
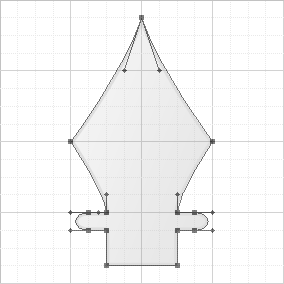
Creating an exact copy of this shape will require you to have some knowledge of the “Convert Point Tool” as well. Once your points are made, go back with the Convert Point Tool, click a point, then click and drag out the point so that you can manually modify the direction handles for custom curves.
Question: Explain Different type of Drawing and type tool in Adobe Photoshop?
Answer:
The Type Tools
The default type tool is the Horizontal Type Tool, which is used to set horizontally oriented type inside of an image. Although Photoshop is a raster based program, it preserves the vector-based type outlines meaning that type can be scaled to any size without losing quality. This property allows us to easily configure type size, style, and other attributes, as well as modify them later on in the design process.Enough of the technical side though. To set type in an image, first select the Horizontal or Vertical Type Tool, and click anywhere inside of your image. You should immediately see a cursor start blinking where you can begin typing. In the options bar, you’ll notice some settings for the currently selected type.

Font Family – Set the currently selected type to a specific font family.
Font Style – Set the font style of the currently selected type. Common styles include bold, italic, and regular.
Font Size – Change the size of the selected type.
Anti-Aliasing Method – Set the method used for anti-aliasing on your type. Anti-Aliasing allows you to create smooth edged type by partially filling edges of the text (rather than the single color, jagged alternative when set to “None”).
Here’s a quick demo showing how Type can be adjusted (Rollover to see changes):

There is much more to Type in Photoshop than shown here, but it would be way outside the scope of this lesson to give much more than a cursory glance of how to use this tool.
Using Shape Tools in Photoshop
There are quite a few predefined vector-based shapes in Adobe Photoshop, all of which can be easily added to graphics. There are 6 different kind of Shape Tools in all. Rectangle Tool – Creates a rectangle shape (or square if constraining proportions by holding shift).
Rounded Rectangle Tool – Creates a rectangle with rounded corners. The roundness of the corner can be controlled by setting a radius in the options bar.
Ellipse Tool - Creates an ellipse shape (or perfect circle if constraining proportions by holding shift).
Polygon Tool – Creates a polygon shape with a specified number of sides set in the options bar.
Line Tool – Creates a line shape.
Custom Shapes – Use predefined shapes (or user created ones) in your graphic.

Be Aware! When you are creating new shapes in Photoshop, make sure you have Shape Layers
selected to create new shapes. Otherwise, you may end up creating
non-vector based shapes on the current layer, or paths rather than
vector-based shapes on there own individual layer.