Question: How to use lasso marquee in Photoshop?
Answer:
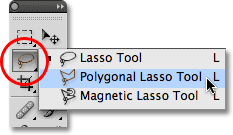
For a faster way to select the Lasso Tool, simply press the letter L on your keyboard. There are two other types of lasso tools as well - the Polygonal Lasso Tool and the Magnetic Lasso Tool, both of which are hiding behind the standard Lasso Tool in the Tools panel. We'll look at both of these tools in separate tutorials, but to access either of them, simply click and hold your mouse button down on the standard Lasso Tool until a small fly-out menu appears, then select either tool from the menu:
Question: How to use rectangular marquee in photoshop?
Answer:
Using the Rectangular Marquee Tool in its most basic form is easy. You simply click with your mouse at the point where you want to begin the selection, which will usually be in the top left corner of the object or area you need to select, then continue holding your mouse button down as you drag towards the bottom right corner of the object or area. When you release your mouse button, the selection is complete.
Question: How to use crop and slice tool in Photoshop?
Answer:
Using the Crop and Slice Tools
The Crop and Slice tools are used to separate and eventually extract or use part of the image that is most important. Cropping takes out everything outside your cropping area. Slicing an image into multiple areas makes smaller image tiles from the main image.
Answer:
The retouching tools in Adobe Photoshop are: Clone Stamp, Pattern Stamp, Healing Brush, Patch and Color Replacement.
These tools repair damaged images, apply repeated patterns, or replace colors in an image.
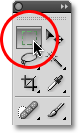
The following illustration shows the arrangement of these tools in the toolbar.
If two or more tools occupy the same cell (the icon for the tool last used is always shown), in order to choose another tool, right-click the mouse on the arrow next to the icon and and choose another tool from the menu that appears. This menu will also appear if you click on the icon and press it for some time.
The Clone Stamp tool and Healing Brush clone (copy) pixels from one part of an image to another, to another layer or even to another image. The difference between the Healing Brush and the Clone Stamp tool is, the Healing Brush in Photoshop takes into account the texture, illumination and shadows of the processed image. As a result, the fragment processed by the Healing Brush blends more easily into the rest of the image.
To clone an area with the Clone Stamp or Healing Brush, follow these steps:
Answer:
For a faster way to select the Lasso Tool, simply press the letter L on your keyboard. There are two other types of lasso tools as well - the Polygonal Lasso Tool and the Magnetic Lasso Tool, both of which are hiding behind the standard Lasso Tool in the Tools panel. We'll look at both of these tools in separate tutorials, but to access either of them, simply click and hold your mouse button down on the standard Lasso Tool until a small fly-out menu appears, then select either tool from the menu:
Question: How to use rectangular marquee in photoshop?
Answer:
Using the Rectangular Marquee Tool in its most basic form is easy. You simply click with your mouse at the point where you want to begin the selection, which will usually be in the top left corner of the object or area you need to select, then continue holding your mouse button down as you drag towards the bottom right corner of the object or area. When you release your mouse button, the selection is complete.
Question: How to use crop and slice tool in Photoshop?
Answer:
Using the Crop and Slice Tools
The Crop and Slice tools are used to separate and eventually extract or use part of the image that is most important. Cropping takes out everything outside your cropping area. Slicing an image into multiple areas makes smaller image tiles from the main image.
- Crop (C): Click and drag with this tool to create an adjustable crop area of your image. Press Enter to crop the canvas to your rectangular area. Press Esc to cancel the crop. After you crop your image, part of the image is gone; make sure that if you save over the original image, you won’t need the content you have cropped out.
- Slice (K): Used for creating web images, the slice tool creates rectangular slices from which you can export individual graphics. Build web button interfaces in one canvas and save to sliced areas for your web page.
- Slice Select (K): Select your image slices and adjust the size of the slices by moving the handles. Hold down the Shift key to select multiple slices at once.
Answer:
The retouching tools in Adobe Photoshop are: Clone Stamp, Pattern Stamp, Healing Brush, Patch and Color Replacement.
These tools repair damaged images, apply repeated patterns, or replace colors in an image.
The following illustration shows the arrangement of these tools in the toolbar.
If two or more tools occupy the same cell (the icon for the tool last used is always shown), in order to choose another tool, right-click the mouse on the arrow next to the icon and and choose another tool from the menu that appears. This menu will also appear if you click on the icon and press it for some time.
The Clone Stamp tool and Healing Brush clone (copy) pixels from one part of an image to another, to another layer or even to another image. The difference between the Healing Brush and the Clone Stamp tool is, the Healing Brush in Photoshop takes into account the texture, illumination and shadows of the processed image. As a result, the fragment processed by the Healing Brush blends more easily into the rest of the image.
To clone an area with the Clone Stamp or Healing Brush, follow these steps:
- Step 1. Choose the tool from the Toolbar.
- Step 2. Set the parameters for the tool in the Options panel: size, blending mode, the amount of opacity and others.
- Step 3. Check Use All Layers, if you need to work with several layers at once.
- Step 4. Check Aligned to create one clone selected from the area around a starting point. The mouse button can be released and new fragments selected. Also, the mode and size of the tool can be changed. If Align is unchecked, then each application of the tool will create a clone from the same starting point.
- Step 5. Set a starting point. Do this by holding ALT, and then left-clicking on the point from which the clone will be taken.
- Step 6. Move the cursor to the location where you want to copy the fragment.
- Step 7. Press the left mouse button and the clone will be applied. If the Healing Brush is used, then the cloned fragments, texture, luminance, and shadows, will be processed in relation to the pixels of the background image.
Question: How to
use layers in Photoshop?
Answer:
Display the Photoshop
Layers panel
·
Choose Window > Layers.
Choose a command from the
Photoshop Layers panel menu
·
Click the triangle in the upper-right corner of
the panel.
Change the size of
Photoshop layer thumbnails
·
Choose Panel Options from the Layers panel menu,
and select a thumbnail size.
Convert a background into a
Photoshop layer
1. Double-click
Background in the Layers panel, or choose Layer > New > Layer from
Background.
2. Set
layer options.
3. Click
OK.
Question: How to
use measuring tool in Photoshop?
Answer:
Measure between two points
- Select the Ruler tool (If the Ruler isn’t visible, hold down the Eyedropper tool.)
- Drag from the starting point to the ending point. Hold down the Shift key to constrain the tool to 45° increments.
- To create a protractor from an existing measuring line, Alt-drag (Windows) or Option-drag (Mac OS) at an angle from one end of the measuring line, or double-click the line and drag. Hold down the Shift key to constrain the tool to multiples of 45°.
Edit a measuring line
- Select the Ruler tool .
- Do one of the following:
o
To resize the line, drag one end of an existing
measuring line.
o
To move the line, place the pointer on the line
away from either endpoint, and drag the line.
o
To remove the line, place the pointer on the
line away from both endpoint, and drag the line out of the image, or click clear
in the tool options bar.